You’ve vetted your options. You’ve made an informed decision. And now you’re ready to onboard your preferred SaaS vendor. Except the problem is you don’t have a repeatable process for a task that, chances are, you’re going to be doing more than once.
What’s the IT department to do? If you haven’t yet been introduced to it already, Jira can help you take care of your vendor discovery and onboarding process. It’s one of the best ways to get a handle on your onboarding process. Both to ensure compliance and that every necessary step is taken care of, and to ensure you have a repeatable framework that anyone can take and follow if the need arises.
In other words, you don’t want to be the only one in the office who’s able to properly onboard SaaS employees. You want to make the process accessible to your team members too.
To help, here’s a quick and dirty guide on how you can use Jira to onboard your next SaaS vendor seamlessly. But first, let’s lay the foundation so you can get started on the right foot.
Consider templates as a resource
Surprise! Jira offers templates like these so you don’t have to start from scratch. That’s good news for you. It means you won’t have to spend time creating something when a lot of it has already been created for you.
Look through each template and pick one to modify to your needs.
An overview of the basics
Onboarding a SaaS vendor includes a common lifecycle.
The first step is choosing the vendor, then collecting details on what they offer and how they can best serve your needs.
In this process, there’s also a security and compliance check to ensure that your data, and your third-party data, is properly protected.
From there, you usually run their information through each key decision-maker to either give it the green light or reject it. After that, you establish your usage agreement and document any necessary steps, train your employees to use the new vendor, and keep up with periodic updates or renewals. Makes sense and it’s pretty straightforward, right?
The problem is, without a repeatable process you can count on to keep you organized and on track, it can be easy to miss key details, have compliance issues, or even run into a security disaster down the road. With a tool like Jira, you can ensure that you maximize the upside of your onboarding process and minimize mistakes.
A SaaS vendor onboarding process helps you:
- Be more productive
- Save time and money long-term
- Easily verify key documents
- Keep track of all your licenses in one place
- Have one source of truth you can reference in the future
- Ensure security compliance
As you create your vendor onboarding process, create a list of necessary steps. For example, will you need to create an initial document for SaaS vendor contacts and upcoming appointments? Will you need to create one space where you keep a running list of all vendor licenses?
Once you answer such questions, you’ll be better equipped to choose the workflow process in Jira that will work best for you.
Set it all up
Here are a few ways to create a Jira workflow you can customize to your needs in just a matter of minutes.
Create a Kanban process
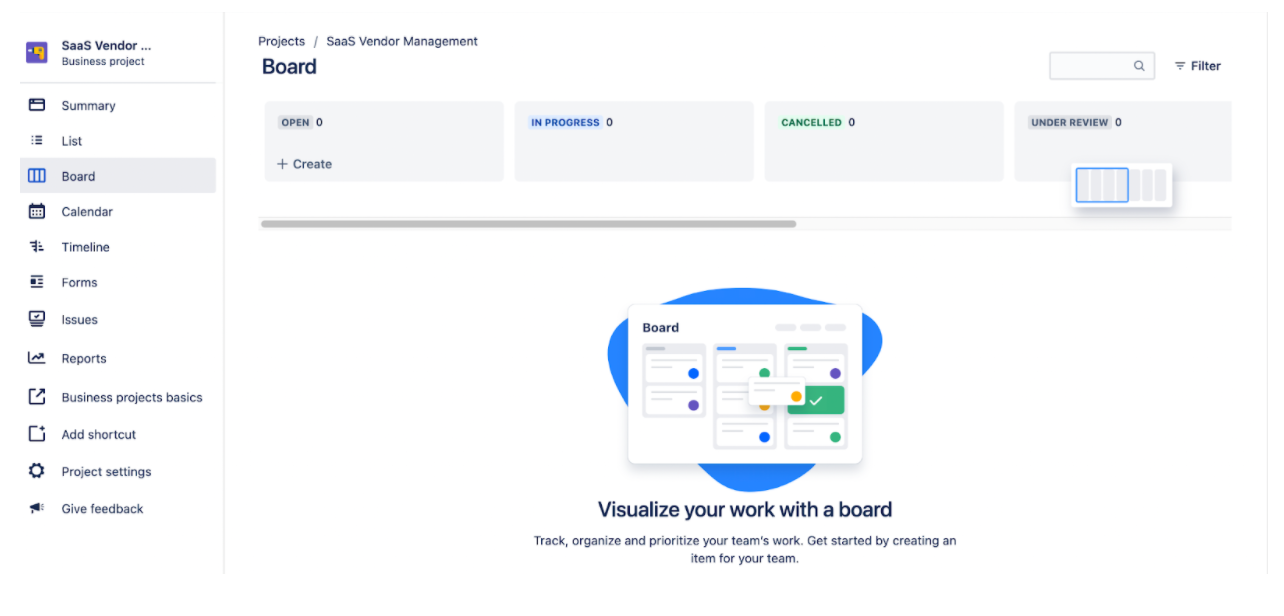
Once you’re logged into Jira, click on Projects, then Create New Project. From there, click on Board. Here’s where you’ll be introduced with a template of a Kanban spread where you can create a SaaS vendor onboarding process so that you don’t miss any steps.
Remember that as you refine your process, your needs will change. It’s important that your Jira workflow reflects that. Sometimes, your onboarding process will be as simple as each category included in the board. For example, you can use the open, in progress, canceled, or under review boards to keep track of every step of your onboarding process.
Each card can house more specifics for each vendor that you can modify as you go.
Design a workflow
Now, what if you need a way to manage processes that are too complex for a simpler kanban approach? This is where you’ll want to start designing your own workflows.
This way, you can modify how certain tasks are managed in a workflow and have greater control over any given project. In our case, it’s ensuring each SaaS vendor gets onboarded properly.
To create a workflow, click on Add Workflow in the top right corner from your administrative dashboard. Make sure you name your workflow and add a description then click on Add.
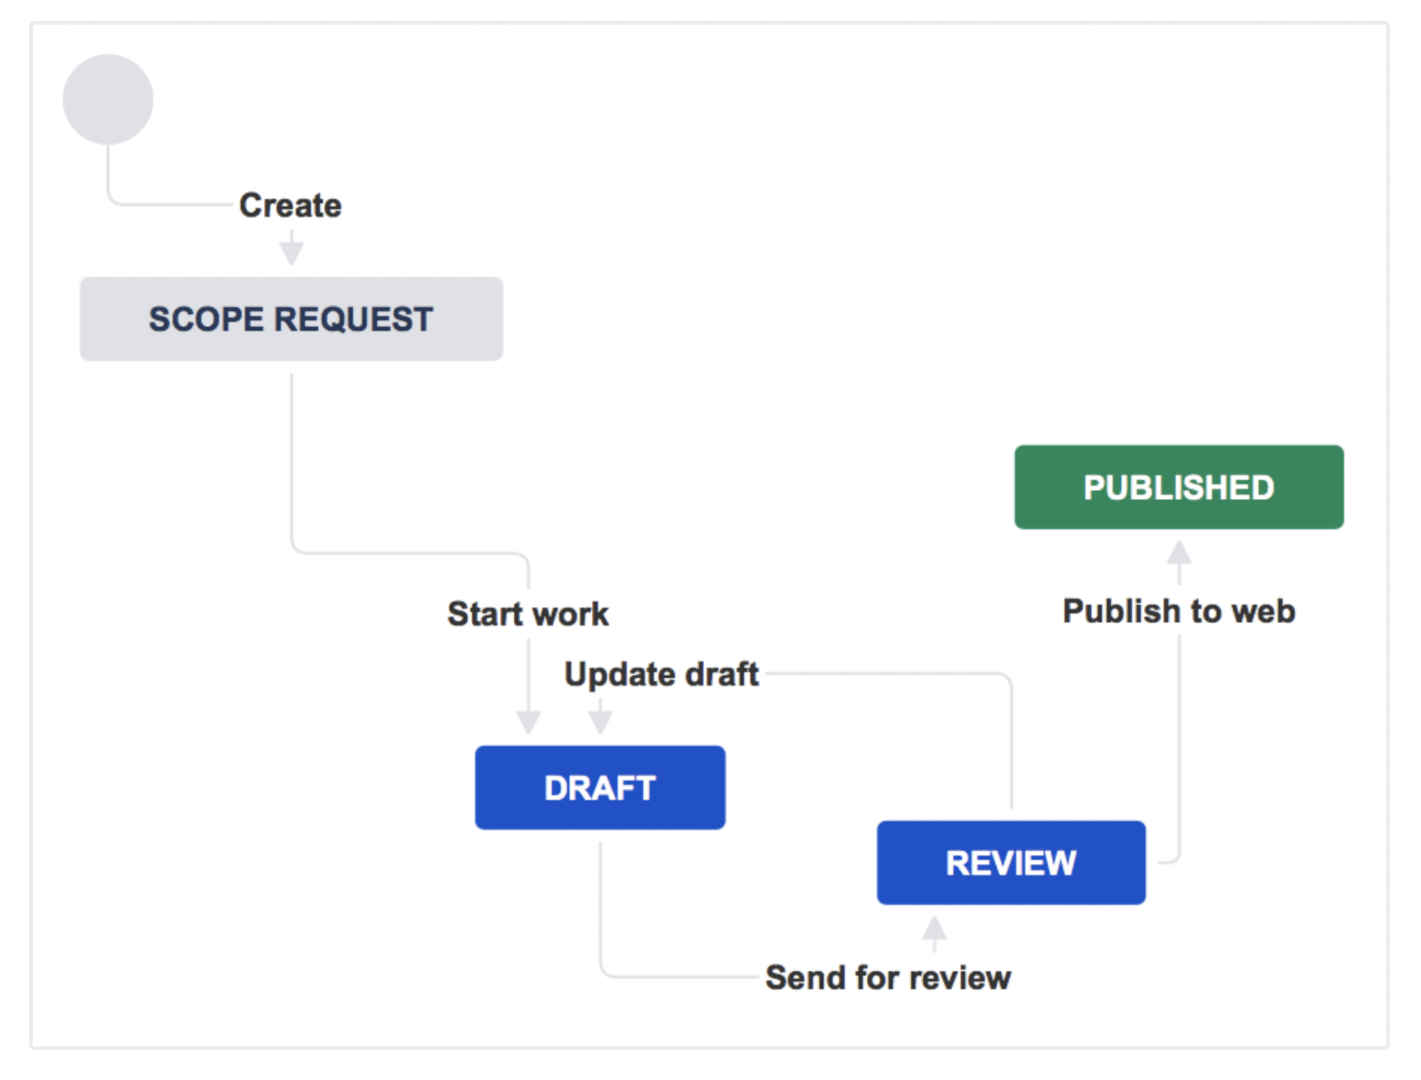
From there, you’ll be met with a blank workflow dashboard. Now, it’s a matter of adding transitions or statuses to your workflow until you have a completed process.
Here’s an example of what it can look like once you start building it out.
Bringing it all together
By this point, you should have a vendor onboarding process that’s repeatable, dependable, and created with your needs in mind. Taking the time to create such a workflow has the potential to save you hours of work and make fewer mistakes that could prove to be costly to your company.
The next time you need to properly onboard a SaaS vendor, you’ll have a streamlined process. This saves money and ensures compliance, all without getting stuck in any one onboarding task.
But, as you probably already know, the road doesn’t stop there. In fact, properly onboarding all your SaaS vendors is just the beginning. From there, there are support tickets to answer, onboarding and offboarding processes to create and refine, and approval processes to oversee.
In short, it can be a lot to take care of manually. Not only is it time-consuming, but with automation, it doesn’t have to be yet another task that bogs you down. That’s why we’ve created Multiplier, as a SaaS asset manager to keep all your SaaS needs under control.
As your SaaS ecosystem grows, so does the need to manage them all. This includes things like streamlining the way you manage support tickets, access controls, and even employee onboarding.
Someone’s gotta do it. That’s why we’ve signed up for the job. Check out Multiplier here and get started for free.


![How Often Should IT Review User Access? [2026 Guide]](https://cdn.prod.website-files.com/60cc3b1de50f53117a9c8119/6a66a1cf885673df12066292_how-often-should-it-teams-conduct-access-reviews-for-audit-trails-2-hero-1785110967342.jpeg)